

SCHOOL OF INSULATION - LESSON 6 - Errors in the Execution - Summary

LESSON 6
ERRORS IN THE EXECUTION - SUMMARY
This lesson of thermal insulation is a kind of summary of the lessons which we have presented in this publication. With this book we wanted to provide information about the technology of proper installation of the thermal insulation: in each lesson we were discussing the key aspects and problems associated with them. We decided that it is worth to take a look and discuss the various stages of the most frequently committed errors once more.
People say: only those who do nothing, do not make mistakes. It is important to learn from mistakes and try not to duplicate them in the future. This is particularly true in the construction industry, where technologies are tightly linked and one small mistake at the beginning can impact the whole work, destroying the final result. There is a big responsibility in this branch, that is why it’s good to get vast knowledge of theory and practice.![]()
An important aspect of the insulation is to install it in accordance with the design documentation. If you find inaccuracies there, it is best to address them immediately by asking for clarification. We briefly introduce a few items that should raise doubts of installers:
• indication of the general name of the material (tar, polyethylene, polystyrene, wool, cellular concrete) without specifying the type, variety and the necessary parameters,
• providing of alternative materials with different properties (e.g., full ceramic brick or sand-lime brick),
• lack of confirmation of thickness of one or more partition layers (layers are specified without giving their exact thickness),
• no detailed description of the types of layers (in the description of partitions is only general „partition“),
• no specified U-values for external walls nor the E - coefficient,
• providing of U-value for external walls only (lack of data on other partitions), or information that U-value meets the requirements of U standard without specifying its value,
• lack of U-value or E – coefficient calculations,
• lack of solution for local thermal bridging,
• lack of information about appropriate technical solutions for places of reduced vapour and thermal insulation,
• no construction details drawings nor technical drawings concerning the places vulnerable to increased heat and water vapour flow (rims, eaves, balconies, window sills, lintels, etc.),
• careless and illegible drawings, brief technical description without taking account of all the data about the object,
• working on outdated standards and regulations,
• duplication of solutions (drawings, details) without consideration of the object particularities (the same drawings attached to different documents),
![]()
If we are sure that the documentation is impeccable, let‘s look at the executive errors during the various stages of work, step by step.:
1. Substrate Preparation
Evaluation of the substrate is essential. The easiest way is to divide the substrates to new ones, i.e. designed for thermal insulation already during the construction process, and the old ones for various reasons not designed for insulation. The first ones are not a problem. Just make sure that they are sufficiently dry, cleaned of any dirt and have a well-regulated absorption. The problem occurs when the old substrates are covered with e.g. a weakened plaster, dirt, algae, lichens, coating.

Errors:
• wrong assessment of the geometry of the walls – their equality and the vertical deviation,
• cursory check of the substrate, leaving coatings (photo 1),
• inaccurate removal of surface contaminants and biologically contaminated items
• no priming of absorbent plaster surface, e.g. of cement - lime one
• leaving the surface covered with algae and lichens.
Consequences:
Loosening of the entire insulation system.
Advices:
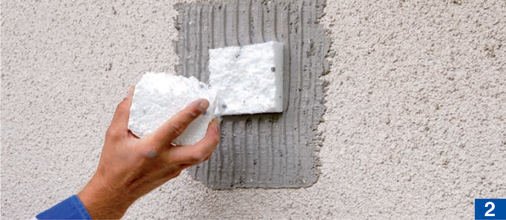
• leveling the wall surface with leveling mortars in order to avoid application of adhesive in thick patches. In extreme cases – installation of additional polystyrene layer under the main one,
• test of adhesion with polystyrene cube in order to assess the quality of the substrate prior to insulation (Photo 2),
• wash off the old surface, e.g. with high-pressure washer,
• in case of doubt about the substrate quality – prime the surface with ATLAS UNI-GRUNT/AVAL KT 17,
• surface protection with fungicide agents, such as ATLAS MYKOS PLUS
2. Installation of Insulation
Polystyrene insulation boards or mineral wool panels are the key elements of the building‘s thermal protection. This phase of work is particularly important - mistakes made here can hardly be repaired and have impact on the next layers of the system.
Errors:
• inappropriate selection of adhesive
• installation of boards with points of adhesive only,
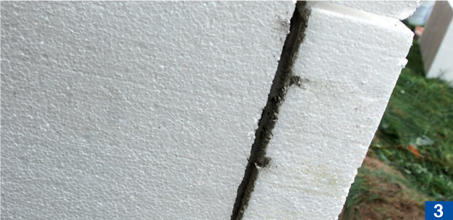
• leaving unfilled gaps between the boards or filling them with mortar (Photo 3),
• carrying out work in unfavourable thermal conditions,
• uneven application of boards/panels,
• the vertical board joints are not staggered and, additionally, not overlapped at the building corners.
Consequences:
• mismatched adhesive - despite initial installation of the insulation, the whole system can loosen with successive layers of the system. It leads to the necessity of the system dismounting. (Photo 4),

• application with ‘points’ only does not provide adequate adhesion and may lead to loosening. Between the insulation and the wall surface there is a vertical gap formed, the so-called „chimney“, which is a fire hazard and significantly reduces the thermal insulation of the system,
• a gaping of insulation creates thermal bridging, which, in additionto the insulation effectiveness decreasing, can cause biological corrosion, resulting in loosening of the insulation,
• installation of thermal insulation at high temperatures can cause too rapid drying of the adhesive between the substrate and the insulation and ineffective system bonding. Too low temperature or high humidity extends the process of binding or even causes its stoppage,
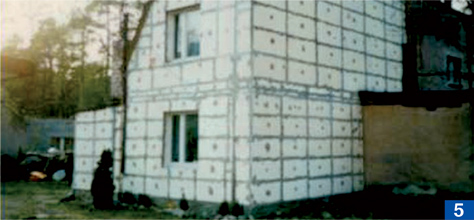
• lack of staggering and overlapping of boards (as in bricklaying) does not allow the insulation to work properly. It may even lead to a construction disaster (Photo 5).
Advices:
• use only recommended products,
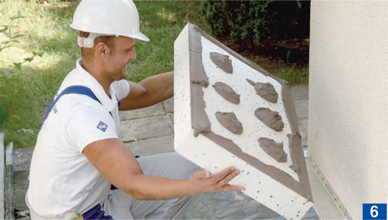
• application (e.g. polystyrene) with the use of ‘ribbon’ stripe together with „points“ method is a guarantee that the insulation will bond to the surface properly and meet all the requirements (Photo 6),
• use of mechanical fixings in the case of the „old“ substrates,
• carrying out works from March to October and in temperatures from +5 up to +25. In other cases, to ensure proper temperature and humidity, use a protective net or a tarpaulin fastened to the scaffolding,
• strict adherence to the principles of staggering and overlapping, adequate distribution of boards.
3. MECHANICAL FIXING
Mechanical fasteners giving additional mechanical fixing of the insulation layers, are particularly important at high buildings exposed to intense forces of nature, especially wind loads, as well the municipal buildings on critical grounds.
Errors:
• poor choice of the type of anchors to the type of substrate and insulation,
• inadequate number and spacing of anchors,
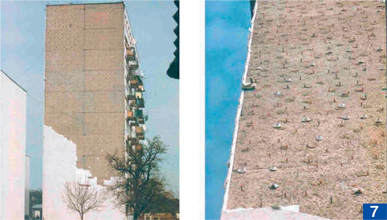
• poorly fixed anchors (Photo 7)
Consequences:
• not every anchor is suitable for all substrates. Fixing the wrong anchor may cause additional thermal bridging,
• fixing anchors in too small or too large number will not strengthen the system, it may even cause its weakening,
• hammering the anchor too deep, and then sealing it with large amount of an adhesive, will result in so-called „ladybug“ marking on the façade, visible at temperature changes
or rain.
Advices:
• use of project documentation. If this is not possible, seek information from advisors of thermal insulation manufacturers,
• adherence to the instructions of insulation systems manufacturer,
• in the case of hammering the anchor too deep - fill the place to the surface of insulation with special caps made of the same insulating material. Alternatively fill it with expanding foam.
4. REINFORCING LAYER INSTALLATION
Reinforcing layer (basecoat) gives strength to the insulation. Full description of its significance is in the lesson number 3.
Errors:
• poorly prepared insulation surface before the execution of the reinforcing layer,
• inadequate protection of the corners of the building
• no additional diagonal reinforcing strips in the corners of the reveals,
• use of improper reinforcing mesh,
• inadequate embedding of the reinforcing mesh,
• lack of appropriate mesh overlapping,
• leveling the surface with another adhesive layer after complete drying of the previous one,
• negligent installation of the reinforcing layer,
Consequences:
• if we do not sand the protruding edges of the boards to even the surface prior to the execution of the reinforcing layer, we can expect higher consumption of adhesive, the inability to achieve an even surface under the reinforcing layer and consequently under the render.
• use of wrong corner profiles, e.g. without a mesh, and installing them contrary to the technology means that even a small mechanical damage may result in loosening of the entire corner,
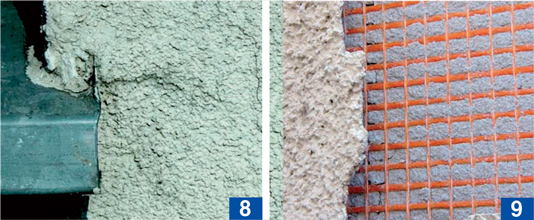
• lack of diagonal reinforcing strips in the corners of window and door reveals will cause cracking in these areas, which in turn will contribute to blister formation and loosening of the thermal insulation layers (photo 8),
• unauthorized mesh cannot fulfill its function, which may even result in render cracking,
• embedding the mesh in an adhesive that has not been properly distributed with a notched trowel or using nails to attach mesh to polystyrene, and then floating its surface will cause cracking or loosening,
• overlaps on the mesh joints of less than 10 cm may cause the occurrence of cracks,
• leveling the surface of the completely dry reinforcing layer with another adhesive layer is the main cause of loosening of render together with this additional adhesive layer (photo 9),
• negligent execution of the reinforcing layer prevents the even application of thin-layer render and forces the surface leveling with render, which means larger and more expensive use of it.
Advices:
The use of authorized materials (adhesives, mesh) and following the detailed instructions during the installation of the reinforcing layer. Irregularities at this stage will be clearly visible on the surface of the render.
5. RENDERING
Errors in application of thin-layer renders are easily and clearly visible. Although the easiest to catch and determining the final result – they are fairly common.
Errors:
• inappropriate selection of render to the type of insulation,
• savings thanks to excessive dilution of the primer,
• i n the process of application, too small number of people in relation to the surface,
• lack of planned technological breaks,
• work in unsuitable weather conditions
![]()
Consequences :
• wrong choice of render can cause excessive soiling, faster fouling with algae. It can also limit the diffusion of water vapour through the system and lead to the loosening of the render,
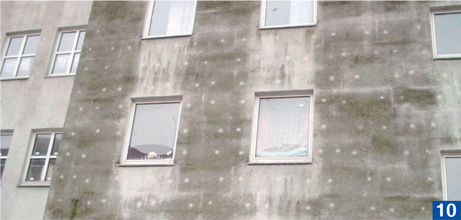
• excessive dilution of the primer reduces the adhesion of the render. Another consequence is uneven absorption of the surface (photo 10),
• in the case of large façade surface, the effect is often spoiled by visible render joints,
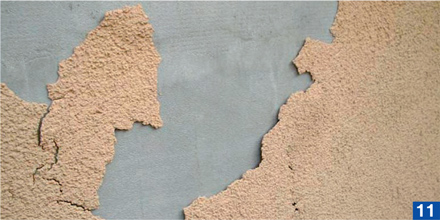
• drying of thin-layer render instead of setting in a natural process, especially in the summer months (photo 11).
Advices:
• detailed checking of the project documentation. In its absence, contact the manufacturer‘s representative,
• appropriately diluted primer results in lighter work with the render and provides uniform substrate absorption,
• ensuring adequate number of workmen, especially during dispersion renders application on large surfaces,
• proper planning of technological breaks,
• the application of render during unfavourable conditions – the surface should be protected not only during application but also until the render fully sets. This approach minimizes the risk of rapid drying and the impact of rain or cold. For this purpose, as in the case of execution of the reinforcing layer, use a protective nets and tarpaulins. In the case of low temperatures we recommend the construction of the so-called ‘heat-zone’, using heat blowers. Due to limited article space we have described the errors only briefly and in a fairly simple form. Although for some they are obvious, sometimes it is worth to confirm your knowledge. For others, however, it can be a valuable indication and the first step to change bad habits.
At the end of this series, we would like to specifically raise awareness of the fact that some of the errors committed in the execution of thermal insulation are not always immediately apparent. Due to the thermal insulation system nature they can occur even after a long time, often counted in years - so it‘s important to avoid any possible shortcomings and save yourself and the customers the troubles. We hope that we have given tips that can be helpful to you and make your work a little bit easier.
Related Products
-
![Polystyrene insulation render fixing plug LTX 10x120mm]() Polystyrene insulation render fixing plug LTX 10x120mm£0.24 / pcs £0.20 / pcs£0.20 / pcs£0.17 / pcs
Polystyrene insulation render fixing plug LTX 10x120mm£0.24 / pcs £0.20 / pcs£0.20 / pcs£0.17 / pcs -
![silicone-render-ATLAS]() Silicone render Atlas SAH N15 dotted white 25kg£71.40 / bucket £59.50 / bucket£61.20 / bucket£51.00 / bucket
Silicone render Atlas SAH N15 dotted white 25kg£71.40 / bucket £59.50 / bucket£61.20 / bucket£51.00 / bucket -
![Plastic Cutter WK-FT for Styrofoam panels]()